Setting Up An ELK Stack for IRC Logs: Part Two
This post will outline getting an Elasticsearch cluster setup in a cloud environment.
This post will be dedicated to getting Elasticsearch setup. I will outline the general setup, different broadcast protocols and some problems that I ran into while getting the cluster setup.
Note: Setup was performed on 1 GB General Purpose v1 Ubuntu 14.04 LTS servers on the Rackspace Cloud.
Setting up Elasticsearch
- Install Java 8. Via AskUbuntu
$ sudo apt-add-repository ppa:webupd8team/java
$ sudo apt-get update
$ sudo apt-get install oracle-java8-installer
- Create a user for Elasticsearch. As of
elasticsearch-2.x.x,elasticsearchcan no longer be run asroot.
$ adduser elastic
# enter password, etc.
$ sudo adduser elastic sudo # if we do this now, we can take care of the iptables rules later without switching users
$ cd ~ # go to elastic home directory
- Fetch
elasticsearchand untar it.
$ wget https://download.elasticsearch.org/elasticsearch/release/org/elasticsearch/distribution/tar/elasticsearch/2.1.0/elasticsearch-2.1.0.tar.gz
$ tar xzf elasticsearch-2.1.0.tar.gz
$ cd elasticsearch-2.1.0
Note: I used elasticsearch-2.1.0 for the remainder of the blog post. This has cascading effects which I will discuss below.
- Run
elasticsearch.
$ bin/elasticsearch
[2015-11-30 20:27:05,128][INFO ][node                     ] [Her] initializing ...
[2015-11-30 20:27:08,730][INFO ][node                     ] [Her] initialized
[2015-11-30 20:27:08,733][INFO ][node                     ] [Her] starting ...
[2015-11-30 20:27:09,006][INFO ][transport                ] [Her] publish_address {127.0.0.1:9300}, bound_addresses {127.0.0.1:9300}, {[::1]:9300}
[2015-11-30 20:27:09,041][INFO ][discovery                ] [Her] elasticsearch/k42QuVacTlmyz6HkmjDOoA
[2015-11-30 20:27:12,146][INFO ][cluster.service          ] [Her] new_master {Her}{k42QuVacTlmyz6HkmjDOoA}{127.0.0.1}{127.0.0.1:9300}, reason: zen-disco-join(elected_as_master, [0] joins received)
[2015-11-30 20:27:12,190][INFO ][http                     ] [Her] publish_address {127.0.0.1:9200}, bound_addresses {127.0.0.1:9200}, {[::1]:9200}
[2015-11-30 20:27:12,193][INFO ][node                     ] [Her] started
There will be some other logs mixed in here, but this is the gist. Here, Her is a random node name and elasticsearch is the default cluster name. It binds to the local interface on port 9300 for the transport module and 9200 for the http module by default (which we’ll discuss later). Additionally, it elects itself as master because it did not detect any other running instances of elasticsearch.
Networking
Unicast
I will start by showing you how to configure your nodes to communicate via the unicast protocol first. As of [elasticsearch-2.0.0](https://www.elastic.co/guide/en/elasticsearch/reference/2.1/release-notes-2.0.0-beta1.html), unicast discovery is now the default.
If you look inside ~/elasticsearch-2.1.0/config/, you will see a file named elasticsearch.yml. By default, everything in this file is commented out. We’ll now edit the configuration to enable these nodes to communicate with eachother via unicast.
- Setup the configuration file.
# This value will be the same across all instances of elasticsearch
cluster.name: irc
# This value is unique per instances
node.name: node-1
# The interface you want elasticsearch to communicate over, I used the public interface
network.host: 123.456.789.100
# A list of other node's host:port running elasticsearch
discovery.zen.ping.unicast.hosts: ["456.789.101.234:9300", "789.101.234.567:9300"]
Note: 9300 is the default port that the transport module communicates over. 9200 is the default port for the http module that provides the elasticsearch API.
- Be sure to open up ports via
iptables.
$ sudo iptables -A INPUT -i eth0 -p tcp --dport 9300 -m state --state NEW,ESTABLISHED -j ACCEPT
$ sudo iptables -A OUTPUT -o eth0 -p tcp --sport 9300 -m state --state ESTABLISHED -j ACCEPT
These rules will open communication over port 9300 on the public interface (eth0).
Repeat steps 1 and 2 for all nodes in your cluser. Make sure to change the
node.nameanddiscovery.zen.ping.unicast.hostsaccordingly.Start up your
elasticsearchinstances.
elastic@node-1 $ cd ~/elasticsearch-2.1.0
elastic@node-1 $ bin/elasticsearch
[2015-12-02 21:56:40,260][INFO ][node                     ] [node-1] initializing ...
[2015-12-02 21:56:43,691][INFO ][node                     ] [node-1] initialized
[2015-12-02 21:56:43,693][INFO ][node                     ] [node-1] starting ...
[2015-12-02 21:56:43,952][INFO ][transport                ] [node-1] publish_address {xxx.xx.xx.xx:9300}, bound_addresses {xxx.xx.xx.xx:9300}
[2015-12-02 21:56:43,992][INFO ][discovery                ] [node-1] irc/dg72ivnNTxCD6K3co6tslw
[2015-12-02 21:56:47,042][INFO ][cluster.service          ] [node-1] new_master {node-1}{dg72ivnNTxCD6K3co6tslw}{xxx.xx.xx.xx}{xxx.xx.xx.xx:9300}, reason: zen-disco-join(elected_as_master, [0] joins received)
[2015-12-02 21:56:47,074][INFO ][http                     ] [node-1] publish_address {xxx.xx.xx.xx:9200}, bound_addresses {xxx.xx.xx.xx:9200}
[2015-12-02 21:56:47,075][INFO ][node                     ] [node-1] started
[2015-12-02 21:56:47,123][INFO ][gateway                  ] [node-1] recovered [0] indices into cluster_state
[2015-12-02 21:56:54,298][INFO ][cluster.service          ] [node-1] added {{node-2}{cmkqC4ljRZCBD7KSAV2VsQ}{yyy.yy.yy.yyy}{yyy.yy.yy.yyy:9300},}, reason: zen-disco-join(join from node[{node-2}{cmkqC4ljRZCBD7KSAV2VsQ}{yyy.yy.yy.yyy}{yyy.yy.yy.yyy:9300}])
elastic@node-2 $ cd ~/elasticsearch-2.1.0
elastic@node-2 $ bin/elasticsearch
[2015-12-02 21:56:53,118][INFO ][node                     ] [node-2] initializing ...
[2015-12-02 21:56:56,534][INFO ][node                     ] [node-2] initialized
[2015-12-02 21:56:56,543][INFO ][node                     ] [node-2] starting ...
[2015-12-02 21:56:56,738][INFO ][transport                ] [node-2] publish_address {yyy.yy.yy.yyy:9300}, bound_addresses {yyy.yy.yy.yyy:9300}
[2015-12-02 21:56:56,771][INFO ][discovery                ] [node-2] irc/cmkqC4ljRZCBD7KSAV2VsQ
[2015-12-02 21:56:59,928][INFO ][cluster.service          ] [node-2] detected_master {node-1}{dg72ivnNTxCD6K3co6tslw}{xxx.xx.xx.xx}{xxx.xx.xx.xx:9300}, added {{node-1}{dg72ivnNTxCD6K3co6tslw}{xxx.xx.xx.xx}{xxx.xx.xx.xx:9300},}, reason: zen-disco-receive(from master [{node-1}{dg72ivnNTxCD6K3co6tslw}{xxx.xx.xx.xx}{xxx.xx.xx.xx:9300}])
[2015-12-02 21:56:59,999][INFO ][http                     ] [node-2] publish_address {yyy.yy.yy.yyy:9200}, bound_addresses {yyy.yy.yy.yyy:9200}
[2015-12-02 21:56:59,999][INFO ][node                     ] [node-2] started
It’s a little difficult to see via the timestamps, but node-1 performs it’s inital setup by 21:56:47. At 21:56:59, node-2 detects that there is a currently running instance of elasticsearch that has deemed itself master. As a result, node-2 joins the cluster.
This step was really just to demonstrate the concept of a master node and other nodes joining the cluster. You can terminate both processes.
- Start
elasticsearchin daemon mode and inspect the cluster.
For these next steps, let’s assume that my configurations are as follows:
cluster.name: irc
node.name: node-1
network.host: 123.456.789.100
discovery.zen.ping.unicast.hosts: ["456.789.101.234:9300"]
cluster.name: irc
node.name: node-2
network.host: 456.789.101.234
discovery.zen.ping.unicast.hosts: ["123.456.789.100:9300"]
elastic@node-1 $ cd ~/elasticsearch-2.1.0
elastic@node-1 $ bin/elasticsearch --daemonize
elastic@node-2 $ cd ~/elasticsearch-2.1.0
elastic@node-2 $ bin/elasticsearch --daemonize
Now, both instances are started, let’s see if we have a cluster.
elastic@node-1 $ curl 123.456.789.100:9200
{
  "name" : "node-1",
  "cluster_name" : "irc",
  "version" : {
    "number" : "2.1.0",
    "build_hash" : "72cd1f1a3eee09505e036106146dc1949dc5dc87",
    "build_timestamp" : "2015-11-18T22:40:03Z",
    "build_snapshot" : false,
    "lucene_version" : "5.3.1"
  },
  "tagline" : "You Know, for Search"
}
elastic@node-1 $ curl 123.456.789.100:9200/_cat/master
iU9QUC-LSLiEJadj2K7Ddw 123.456.789.100 123.456.789.100 node-1
elastic@node-1 $ curl 123.456.789.100:9200/_cat/nodes
456.789.101.234 456.789.101.234 2 93 0.00 d m node-2
123.456.789.100 123.456.789.100 3 94 0.00 d * node-1
elastic@node-1 $ curl 123.456.789.100:9200/_cluster/health?pretty=true
{
  "cluster_name" : "irc",
  "status" : "green",
  "timed_out" : false,
  "number_of_nodes" : 2,
  "number_of_data_nodes" : 2,
  "active_primary_shards" : 0,
  "active_shards" : 0,
  "relocating_shards" : 0,
  "initializing_shards" : 0,
  "unassigned_shards" : 0,
  "delayed_unassigned_shards" : 0,
  "number_of_pending_tasks" : 0,
  "number_of_in_flight_fetch" : 0,
  "task_max_waiting_in_queue_millis" : 0,
  "active_shards_percent_as_number" : 100.0
}
These are just some basic elasticsearch API calls to inspect your cluster quickly. To learn more about the powerful elasticsearch API, you can checkout their documentation here.
Multicast
Here we will discuss the multicast protocol. At the time of writing this article, the multicast protocol was decommissioned as the default in the latest available version of elasticsearch, elasticsearch-2.1.0.
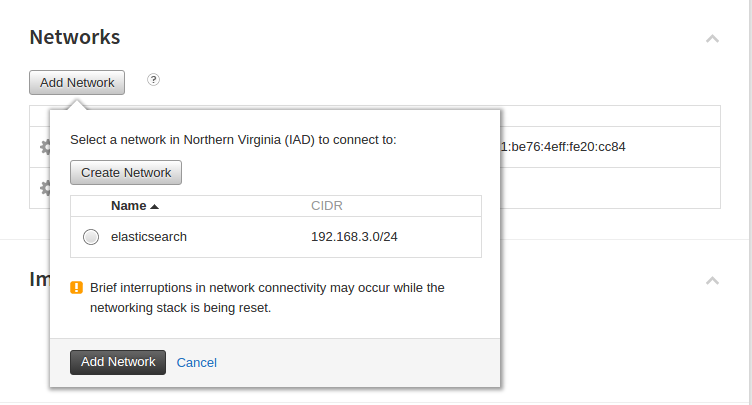
This setup will be done on the Rackspace Cloud as we need a network that supports the multicast protocol, which the Rackspace private networks provide. You can follow these instructions to get your network set up. Next, you’ll have to attach each server that will be running elasticsearch to this network. This, like the steps from the Rackspace article, can be done through the Rackspace Cloud Control Panel:
Assuming you have your nodes connected to a network that supports multicast, we’ll proceed with the elasticsearch setup to support this.
- Figure out what your node’s private IP address is (I have underlined it).
$ ifconfig eth2
eth2      Link encap:Ethernet  HWaddr bc:76:4e:21:03:3a
          inet addr:<strong style="text-decoration: underline;">192.168.3.4</strong>  Bcast:192.168.3.255  Mask:255.255.255.0
          inet6 addr: fe80::be76:4eff:fe21:33a/64 Scope:Link
          UP BROADCAST RUNNING MULTICAST  MTU:1500  Metric:1
          RX packets:803 errors:0 dropped:0 overruns:0 frame:0
          TX packets:8 errors:0 dropped:0 overruns:0 carrier:0
          collisions:0 txqueuelen:1000
          RX bytes:23705 (23.7 KB)  TX bytes:648 (648.0 B)
Our private IP is: 192.168.3.4
- Open up port
9300as we did before, but make sure it is on theeth2interface.
sudo iptables -A INPUT -i eth2 -p tcp --dport 9300 -m state --state NEW,ESTABLISHED -j ACCEPT
sudo iptables -A OUTPUT -o eth2 -p tcp --sport 9300 -m state --state ESTABLISHED -j ACCEPT
- Install the multicast plugin.
$ cd ~/elasticsearch-2.1.0
$ bin/plugin install discovery-multicast
-> Installing discovery-multicast...
Trying https://download.elastic.co/elasticsearch/release/org/elasticsearch/plugin/discovery-multicast/2.1.0/discovery-multicast-2.1.0.zip ...
Downloading ...DONE
Verifying https://download.elastic.co/elasticsearch/release/org/elasticsearch/plugin/discovery-multicast/2.1.0/discovery-multicast-2.1.0.zip checksums if available ...
Downloading .DONE
Installed discovery-multicast into /home/elastic/elasticsearch-2.1.0/plugins/discovery-multicast
- Setup
elasticsearch.yml.
cluster.name: irc
node.name: node-1
network.host: 192.168.3.4
discovery.zen.ping.multicast.enabled: true
- Start
elasticsearchand inspect our cluster.
elastic@node-1 $ bin/elasticsearch --daemonize
elastic@node-2 $ bin/elasticsearch --daemonize
elastic@node-2 $ curl 192.168.3.5:9200/_cat/nodes
192.168.3.4 192.168.3.4 8 93 0.26 d * node-1
192.168.3.5 192.168.3.5 7 92 0.14 d m node-2
Conclusion
With that, I’ve demonstrated how to get Elasticsearch running utilizing the unicast protocol (now default) and the multicast protocol. There is plenty information out there on the different protocols, but this article from Microsoft seems to suggest to use multicast in the case that bandwidth is limited. Admittedly, I don’t know enough about this topic, but one particular area in which I would think multicast proves more beneficial to unicast is when you attempt to add additional nodes to your cluster. If you found yourself in a situation where you would want to add another node, multicast does not require a configuration update and restart amongst nodes. You could simply add it to the private network, start elasticsearch, and it will join the cluster and begin to consume it’s allocation of shards in the cluster. Using unicast, it seems as though you’d have to update the configuration of all current nodes to include your new node which would require a restart to take affect. While joins may be infrequent, they can be made less painful when using the multicast protocol.
I discussed earlier that using elasticsearch-2.1.0 had cascading effects. By this I meant that ELK stack versioning can be difficult. At the time of setting up my cluster, I was using elasticsearch-1.7.3. When I tried to use the latest version of Kibana, it required elasticsearch-2.x.x. By the time I had discovered this, elasticsearch-2.1.0 had been released. When I finally got those agreeing with one another, I noticed that Logstash was seemingly shipping logs, but they were not being indexed into Elasticsearch. Turns out that I needed to update my version of Logstash from 1.5.4 to 2.x.x. My word of advice to you is that before you get started setting up your ELK stack, make sure that the versions agree with each other.
When I started writing my first post I wasn’t sure how many posts this endeavor would end up being. Truth is, I ran into versioning problems, there were breaking changes, and I had to adjust configuration as I went. In the next post, I will wrap up with the Logstash changes I had to make, how to get Kibana running, and potentially some more detail on some of the problems I ran into along the way.

Share this post
Twitter
Google+
Facebook
Reddit
LinkedIn
StumbleUpon
Pinterest
Email